Author: Larry Cotton / Source: Make: DIY Projects and Ideas for Makers
Home coffee roasting has become so popular that Googling the subject yields millions of hits, and rightfully so: the results can be amazing. There’s just no other way to a fresher cup of coffee. And unroasted (green) beans are readily available from hundreds of sources online, and occasionally locally.
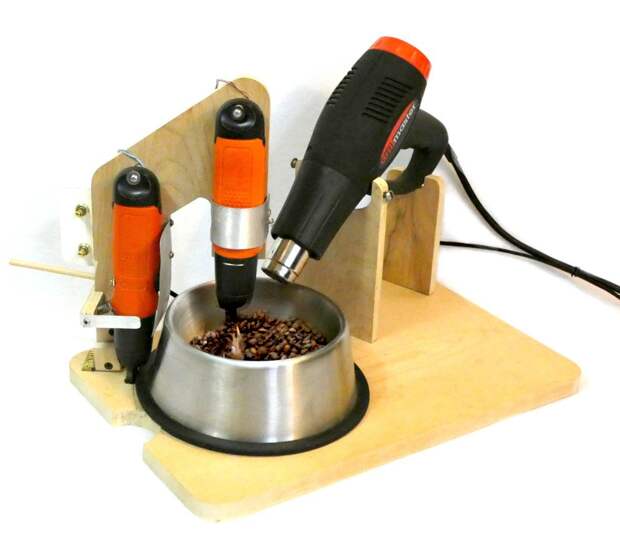
Here’s a cheap, quick, and reliable machine that roasts a decent amount of coffee beautifully with only 5 main parts: two $9 Black & Decker screwdrivers, a $15 heat gun, a cheap power supply and, oh yeah, a (new) dog bowl.
Various incarnations of the heat gun/dog bowl technique are well documented online. This one takes the concept to the next level. It’s easy to build in a day or two, quick to roast, and, best of all, the roasting process is automated, reliably exposing the entire surface of every bean to the same heat.
Cost for the main parts is under $50. Most other materials can be found in a reasonably well-equipped shop. The screwdrivers and power supply are available from Amazon, the heat gun from Harbor Freight, and the wonderful dog bowl from Walmart. (It’s wonderful because it has a rubber anti-skid ring and rounded corners.)
If you live close to a coffee roasting business, ask if they’ll sell you some green beans. If not, Amazon will be happy to have some on your doorstep by the time you finish reading this article. OK, maybe not quite, but go ahead and order 5 pounds of unroasted Kenya AA and start building!

This image identifies most of the parts that will keep the beans constantly moving.
This assembly will be mounted to a wood base, which is made first. If you want to paint or clear-coat the wood parts, do so before any construction.MAKE THE WOODEN PARTS
1. Make the base from a flat 18″ piece of 1×12 pine (¾” ×11¼”) or ¾” plywood. Drill holes A–G as accurately as you can, following the x-y dimensions provided.

2. In the bottom of the base, countersink holes C, D, E, and F to fit flat-head #8×1½” wood screws. Countersink hole G so the 5/16″ bolt’s flat head will be barely sub-flush with the bottom of the base. Thread the bolt into that hole. Put the skate bearing or fidget spinner bearing over the end of the bolt. If you can’t find the specified bearing, use a stack of four 5/16″×¾”×1/16″ flat washers. The bolt must not protrude above the bearing (or washers). If it does, unscrew the bolt a bit, keeping its head sub-flush, and/or grind its end.
If your base is not perfectly flat, attach two or three 2×2 stringers, 11¼” long, perpendicular to the base’s long axis. Just don’t cover any holes.

3. Make three more wood parts in this step and Steps 4 and 5 from ½” project plywood. Use a jigsaw or band saw to cut out the screwdriver holder and hinge mounts. Holes are dimensioned to fit #8×1″ and #8×1½” wood screws. Don’t mount any wood parts to the base yet.


5. Make the front heat gun holder. Its cutout must also clear the housing. Ensure the two threaded holes line up with the mounting bosses on the heat gun. Sand all wood parts with 120- and 320-grit paper. Go ahead and install the two ¼”-20 × ¾” machine screws; these will lock the heat gun in place later.
BUILD THE ROASTING BOWL


6. Make the bearing surround from ¼” project plywood. On one side, slightly countersink the two 1/16″ holes to clear the flat-head screw heads when they poke out of the bottom of the bowl.
The 7/8″ hole fits the specified bearing. If you use washers instead, drill a ¾” hole. In either case, a spade bit is best for this task.
7. On the bottom surface of the bowl, place the surround with its small countersinks toward the bowl, and its big hole concentric with the machined circles in the bowl. This must be accurate so that the bowl won’t wobble excessively side-to-side. (Up to 1/16″ wobble is OK.) Tape it in place.
8. Using a new 1/16″ bit and cutting oil, slowly drill through the surround’s two 1/16″ holes into and through the bowl bottom.
9. From the top of the bowl, gradually countersink the two holes just enough so that the heads of two #4×¼” flat-head screws will not pass through, but will be virtually flush. Attach the surround. If you countersink a hole too much, just drill and countersink another pair of holes; a couple extra holes won’t affect the roasting process. Those screw heads need to be flush so the bean stirrer doesn’t hit them.

10. File, sand, or grind flush the points of the mounting screws if they protrude from the bottom of the surround.
11. Place the bowl/surround assembly over the skate/fidget spinner bearing (or washers). It won’t be easy to locate the first time, so draw a circle on your base around the bowl to speed the process later.
12. Give the bowl a 360° spin. If it wobbles side-to-side more than 1/16″, re-mount the surround more accurately to the bowl. The bowl’s anti-skid ring will be driven by a screwdriver chuck (that normally holds a driver bit). A bit of vertical wobble is OK.
MAKE THE BEAN STIRRER
13. Make the stirrer from 12-gauge solid copper wire. I bought a few feet of 3-conductor cable and stripped about 18″ of insulation from one of the conductors with an X-Acto knife and No. 11 blade.

Bend one wire end twice to yield three ½” segments that will fit into the stirrer screwdriver’s chuck.

Roll up a rough elliptical coil, which can bulge slightly at first, then flatten it and try to keep it symmetrical. This will probably need to be adjusted after you assemble the machine, so just set it aside.
MODIFY THE SCREWDRIVERS
14. Since the…
The post Dog Bowl Coffee Roaster appeared first on FeedBox.